Adding Snippets to Visual Studio Code
Code snippets are ready-made snippets of code you can quickly insert into your source code. For example, a for code snippet creates an empty for loop.
Each snippet defines a prefix under which it will appear in IntelliSense via (kb(editor.action.triggerSuggest)) as well as a body inserted when the snippet is selected. The snippet syntax follows the TextMate snippet syntax with the exception of 'regular expression replacements', 'interpolated shell code' and 'transformations', which are not supported.
Add Snippets from the Gallery
Many snippets have been uploaded to the VS Code Extension Gallery by the community. If you find one you want to use, simply install it and restart VS Code and the new snippet will be available.
You can also browse the VS Code Marketplace to find available snippets.
Creating your Own Snippets
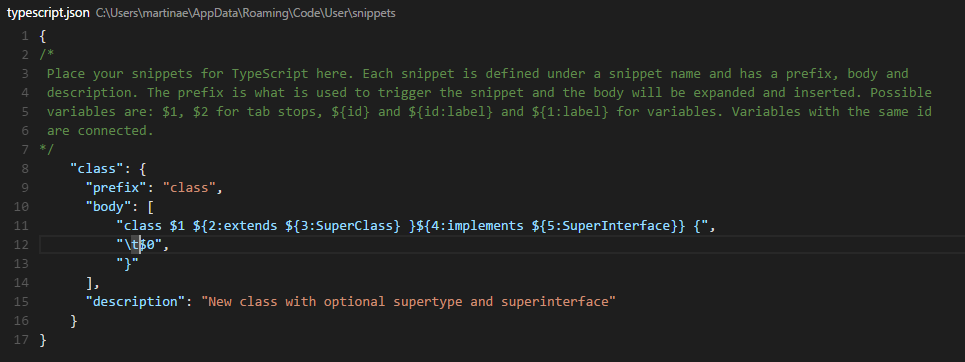
You can define your own snippets for specific languages. Snippets are defined in a JSON format.
The example below is a For Loop snippet for JavaScript.
    "For Loop": {
        "prefix": "for",
        "body": [
            "for (var ${index} = 0; ${index} < ${array}.length; ${index}++) {",
            "\tvar ${element} = ${array}[${index}];",
            "\t$0",
            "}"
        ],
        "description": "For Loop"
    },
In the example above:
For Loopis the snippet nameprefixdefines a prefix used in the IntelliSense drop down. In this casefor.bodyis the snippet content.
Possible variables are:- $1, $2 for tab stops
- ${id} and ${id:label} and ${1:label} for variables
- Variables with the same id are connected.
descriptionis the description used in the IntelliSense drop down
To open up a snippet file for editing, open User Snippets under File, Preferences and select the language for which the snippets should appear.
Once you have added a new snippet, you can try it out right away, no restart needed.
Using TextMate Snippets
You can also add TextMate snippets (.tmSnippets) to your VS Code installation using the yo code extension generator. The generator has an option New Code Snippets which lets you point to a folder containing multiple .tmSnippets files and they will be packaged into a VS Code snippet extension. The generator also supports Sublime snippets (.sublime-snippets).
The final generator output has two files: an extension manifest package.json which has metadata to integrate the snippets into VS Code and a snippets.json file which includes the snippets converted to the VS Code snippet format.
.
├── snippets                    // VS Code integration
│   └── snippets.json           // The JSON file w/ the snippets
└── package.json                // extension's manifest
Copy the generated snippets folder to a new folder under your .vscode/extensions folder and restart VS Code.
Sharing Your Snippets in the Gallery
Once you have created your snippets and tested them out, you can share them with the community.
To do this, you need to create a snippet extension. If you've used the yo code extension generator, your snippet extension is ready to be published.
If you want to share user snippets, you'll need to package your snippet json file along with an extension manifest which has the necessary metadata to integrate the snippets into VS Code.
Depending on your plaform, your user snippets file is located here:
- Windows
%APPDATA%\Code\User\snippets\(language).json - Mac
$HOME/Library/Application Support/Code/User/snippets/(language).json - Linux
$HOME/.config/Code/User/snippets/(language).json
where (language).json depends on the targeted language of the snippets (e.g. markdown.json for Markdown snippets). Create a new folder for your extension and copy your snippet file to a snippets subdirectory.
Now add a extension manifest package.json file to the extension folder. The snippet extension manifest follows the structure defined in the Extension Manifest reference and provides a snippets contribution.
Below is an example manifest for Markdown snippets:
{
    "name": "DM-Markdown",
    "publisher": "mscott",
    "description": "Dunder Mifflin Markdown snippets",
    "version": "0.1.0",
    "engines": { "vscode": "0.10.x" },
    "categories": ["Snippets"],
    "contributes": {
        "snippets": [
            {
                "language": "markdown",
                "path": "./snippets/markdown.json"
            }
        ]
    }
}
Note that snippets need to be associated with a language identifier. This can be a language supported directly by VS Code or a language provided by an extension. Make sure the language identifier is correct.
You then use the vsce publishing tool to publish the snippet extension to the VS Code Extension Gallery.
Tip: To make it easy for users to find your snippet, include the word "snippet" in the extension description and set the
CategorytoSnippetsin yourpackage.json.
We also have recommendations on how to make your extension look great on the VS Code Marketplace, see Marketplace Presentation Tips.
Next Steps
Snippets are just one way to extend VS Code. If you'd like to learn more about VS Code extensibility, try these topics:
- Colorizers and Bracket Matchers - Learn how to import TextMate colorizers
- Custom themes - Learn how to import existing TextMate themes.
- Extending Visual Studio Code - Learn about other ways to extend VS Code
- Editing Evolved - Learn more about the VS Code editor's capabilities
Common Questions
Q: I created a snippets extension but they aren't showing up in the VS Code editor?
A: Be sure you have correctly specified the language identifier for your snippet (e.g. markdown for Markdown .md files, plaintext for Plain Text .txt files). Also verify that the relative path to the snippets json file is correct.