Example - Integrating Debuggers
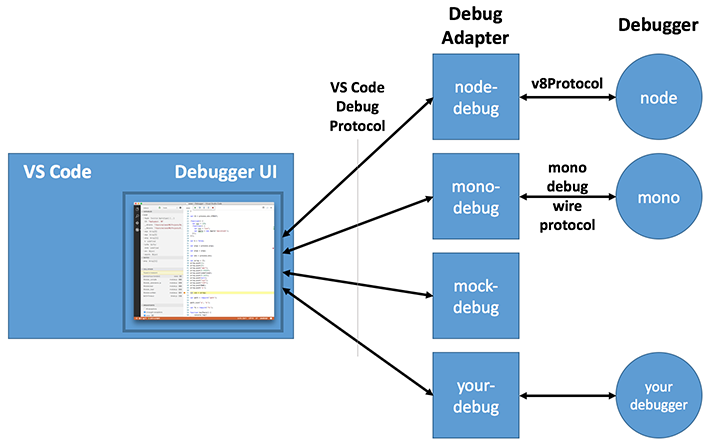
Since Visual Studio Code implements a generic (language agnostic) debug UI, it cannot talk to real debuggers but instead talks to so-called debug adapters through an abstract wire protocol. We call this protocol the VS Code Debug Protocol (or CDP for short). A debug adapter is a standalone executable that typically talks to a real debugger and translates between the abstract CDP and the concrete protocol of the debugger.
In order to avoid problems with local firewalls, VS Code talks to the adapter through stdin/stdout instead of using a more sophisticated communication mechanism.
Every debug adapter defines a debug type which is referenced from a VS Code launch configuration.
When a debug session is started, VS Code looks up the debug adapter based on the debug type and launches the executable as a separate process.
When the debug session ends, the adapter is stopped.
Debug adapters are part of VS Code's extensible architecture: they are contributed as extensions. What sets them apart from other extensions is the fact that the debug adapter code is not running in the extension host, but as a separate standalone program. The reasons for this are twofold: first, it makes it possible to implement the adapter in the language most suitable for the given debugger or runtime. Second, a standalone program can more easily run in elevated mode if the need arises.
Visual Studio Code ships two debug extensions, one for Node.js and one for Mono. More are available from the VS Code Marketplace or you can create a debug extension yourself.
This document will show you how to create a new debug extension.
Installing a Sample Debug Extension
Since creating a debug adapter from scratch is a bit heavy for this tutorial, we will start with a simple debug adapter which we have created as an educational debug adapter 'starter kit'. It is called 'mock-debug' because it does not talk to a real debugger but it 'mocks' one. So mock-debug simulates a debugger adapter and supports step, continue, breakpoints, exceptions, and variable access but it is not connected to any real debugger.
Before delving into the development setup for mock-debug, let's first install a pre-built version from the VS Code Marketplace and play with it:
- use the Command Palette
Extensions: Install Extensionto find and install the mock-debug extension, - restart VS Code.
To try it:
- In VS Code, create a test project with a new "program" file
readme.mdand enter several lines of arbitrary text. - Switch to the Debug view and press the gear icon.
- VS Code will let you select a debug environment (select "Mock Debugger") and creates a default launch configuration for it.
If you now start the launch configuration, you can 'step through' the target file, set and hit breakpoints, and run into exceptions (if the word exception appears in a line).
Development Setup for mock-debug
Now let's get the source for mock-debug and start development on it within VS Code:
git clone https://github.com/Microsoft/vscode-mock-debug.git
cd vscode-mock-debug
npm install
Open the project folder vscode-mock-debug in VS Code.
What's in the package?
the mock-debug implementation lives in src/mock/mockDebug.ts. There you find the request handlers for the various requests of the CDP.
the folder src/common contains the code and definitions of all the node-based implementations of debug adapters most likely to be shared. We plan to make this available as a Node.js module.
- the debugProtocol.d.ts contains a TypeScript specification of the CDP requests, responses, and events.
- the debugSession.ts is a default implementation for the CDP. src/mock/mockDebug.ts is a subclass of that.
the extensions folder contains the final mock-debug extension after it has been built. Initially it only contains the package.json, the manifest for the mock-debug extension.
a gulpfile.js with a build task that transpiles the TypeScript source into the out folder.
Now build and launch the debug adapter by selecting the Launch Extension configuration and hitting F5.
Initially this will do a full transpile of the TypeScript sources into the out folder.
After the full build, a 'watcher task' is started that incrementally transpiles any changes you make.
After building, a new VS Code window shows up where the mock-debug extension runs in debug mode.
You can now open your test project with the readme.md file from above and 'debug' it.
This approach for launching the debug extension like any other extension works well for running the extension but not for debugging it. The problem is that the debug adapter runs as a separate process outside of the extension host. The solution for this problem is to run the debug adapter in server mode:
- run the
mock-debug serverlaunch configuration to start the debug adapter in server mode (it listens on port 4711) - set a breakpoint at the beginning of method
launchRequest(...)in filemockDebug.ts - open the test project with the
readme.mdin an additional VS Code window - in that project add a top-level
debugServerattribute like this:
{
    "version": "0.2.0",
    "debugServer": 4711,

    "configurations": [{
        "name": "mock test",
        "request": "launch",
        "type": "mock",
        "program": "readme.md",
        "stopOnEntry": true
    }]
}
- if you now launch this debug configuration, VS Code does not launch a debug adapter as a separate process but directly connects to local port 4711.
- you should hit the breakpoint in
launchRequest.
With this setup you can now easily edit, transpile, and debug the mock debug and turn it into the debug adapter you want to create.
Implementing the VS Code Debug Protocol
A debug adapter has to implement the VS Code Debug Protocol. You can find more details here.
Anatomy of the Debug Adapter package.json
Let's have a closer look at the debug adapter contribution of an VS Code extension.
Like every VS Code extension, a debug adapter extension has a package.json file that declares the fundamental properties name, publisher,
and version of the extension. Use the categories field to make the extension easier to find in the VS Code extension gallery.
{
    "name": "mock-debug",
    "version": "0.1.5",
    "publisher": "vscode",
    "description": "Starter extension for developing debug adapters for VS Code.",
    "engines": { "vscode": "0.10.x" },
    "categories": ["Debuggers"],

    "contributes": {
        "debuggers": [{
            "type": "mock",
            "label": "Mock Debugger",

            "enableBreakpointsFor": { "languageIds": ["markdown"] },

            "program": "./out/mock/mockDebug.js",
            "runtime": "node",

            "configurationAttributes": {
                "launch": {
                    "required": ["program"],
                    "properties": {
                        "program": {
                            "type": "string",
                            "description": "Workspace relative path to a text file.",
                            "default": "readme.md"
                        },
                        "stopOnEntry": {
                            "type": "boolean",
                            "description": "Automatically stop after launch.",
                            "default": true
                        }
                    }
                }
            },

            "initialConfigurations": [
                {
                    "name": "Mock-Debug",
                    "type": "mock",
                    "request": "launch",
                    "program": "readme.md",
                    "stopOnEntry": true
                }
            ]
        }]
    }
}
More interesting is the specific debuggers section under contributes.
Here one debug adapter is introduced under a (unique) debug type. The user can reference this type in his launch configurations. The optional attribute label can be used to give the debug type a nicer name when showing it in the UI.
With the attribute enableBreakpointsFor you can list the language file types for which setting breakpoints will be enabled.
Since a debug adapter is a standalone application, a path to that application is specified under the program attribute.
In order to make the extension self-contained the application must live inside the extension folder.
By convention we keep this applications inside a folder named out or bin but you are free to use a different name.
Since VS Code runs on different platforms, we have to make sure that the debug adapter program supports the different platforms as well. For this we have the following options:
-
If the program is implemented in a platform independent way, e.g. as program that runs on a runtime that is available on all supported platforms, you can specify this runtime via the runtime attribute. As of today, VS Code supports 'node' and 'mono' runtimes. Our mock-debug adapter from above uses this approach.
-
If your debug-adapter implementation needs different executables on different platforms, the program attribute can be qualified for specific platforms like this:
json
"debuggers": [{
    "type": "gdb",
    "windows": {
        "program": "./bin/gdbDebug.exe",
    },
    "osx": {
        "program": "./bin/gdbDebug.sh",
    },
    "linux": {
        "program": "./bin/gdbDebug.sh",
    }
}]
3. A combination of both approaches is possible too. The following example is from the mono-debug adapter which is implemented as a mono application that needs a runtime on OS X and Linux:json "debuggers": [{ "type": "mono", "program": "./bin/monoDebug.exe", "osx": { "runtime": "mono" }, "linux": { "runtime": "mono" } }]
configurationAttributes represent attributes that are specific for your debugger and are used for validation and suggestion of values in 'launch.json'.
initialConfigurations is used when VS Code generates the 'launch.json'. This should be a default launch configuration that covers configuration attributes of your adapter.
Publishing your Debug Adapter
Once you have created your debug adapter you can publish it to the gallery:
- update the attributes in the
package.jsonto reflect the naming and purpose of your debug adapter. - upload to the gallery as described in Share an Extension section.
Common Questions
Nothing yet